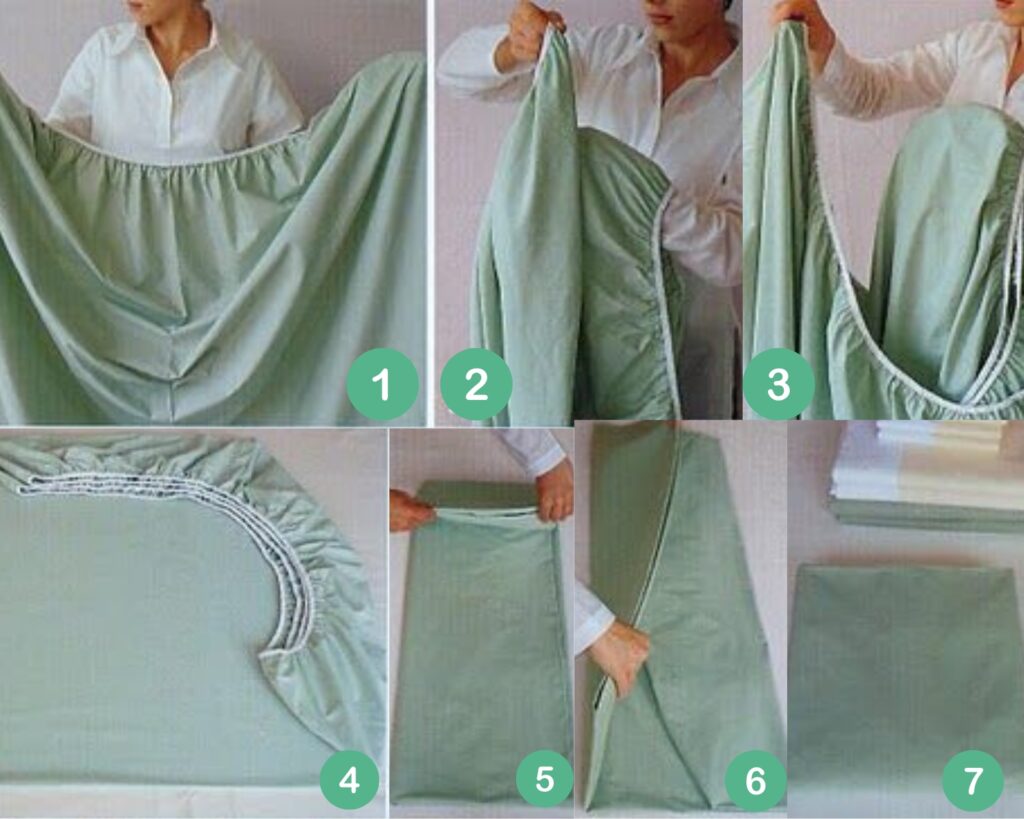
How to Fold and Secure a Fully Elastic Fitted Sheet: A Simple Guide
Fitted sheets can be a challenge to fold neatly because of their elastic edges. They often end up in a wrinkled mess in the closet. But with a few simple steps, you can fold and secure your fully elastic fitted sheet neatly for easy storage. Here’s how:
1. Find the Corners
Start by holding the sheet inside out with one hand in each of the two adjacent corners. Make sure the longer side is vertical if you’re folding a queen or king-sized sheet.
2. Match the Corners
Place one corner over the other, fitting them together so that the elastic edges align. This step helps create a more structured shape.
3. Add the Remaining Corners
Next, grab the third corner and tuck it over the stack of corners you’re holding, followed by the fourth corner. Now all four corners should be neatly layered together in one hand.
4. Lay the Sheet on a Flat Surface
Place the folded sheet on a flat surface, such as a bed or table, with the gathered corners facing up. Smooth out the sheet to remove any creases or bumps.
5. Fold Into a Rectangle
Fold the longer edges of the sheet inward, creating a rectangle. Then fold it in half vertically to make it even neater.
6. Final Fold
Fold the sheet horizontally into thirds or quarters, depending on your storage space. Your fully elastic fitted sheet should now be in a neat, compact rectangle ready for storage.
Tips for Keeping Your Fitted Sheets Tidy
– Store in Pillowcases: Place your folded fitted sheet and matching flat sheet inside a pillowcase from the same set. It keeps everything together and saves space.
– Use Shelf Dividers: Dividers can help prevent sheets from unfolding or mixing with other linens on the shelf.
Why This Method Works
Folding a fully elastic fitted sheet by tucking the corners together reduces the bulkiness and makes it easier to manage the elastic. By laying it flat and folding strategically, you avoid the lumps and wrinkles that often come with just stuffing it in a drawer.
With this simple technique, you’ll never have to deal with messy, bulky fitted sheets again. Now your fitted sheets will be tidy, easy to store, and ready to use whenever you need them!
How to Iron a Sheet: A Step-by-Step Guide
Ironing a sheet, especially a fitted one, can seem tricky, but with a few simple techniques, you can get a crisp, wrinkle-free finish. Here’s a step-by-step guide to help you iron your sheets effectively:
1. Set Up the Ironing Board and Iron
Start by setting up your ironing board in a well-lit area. Adjust the iron to the appropriate setting based on the sheet’s fabric. For cotton sheets, use a higher heat setting, while polyester or blend sheets may require a lower setting. Use steam if your iron has that option to help smooth out wrinkles.
2. Lay the Sheet Flat on the Ironing Board
Place one section of the sheet flat on the ironing board. If you’re ironing a fitted sheet, try to start with one of the corners. Begin by pressing down the elastic edges, smoothing them out with your hands as much as possible to get a flat surface.
3. Iron in Small Sections
To make it easier, iron the sheet in small sections rather than trying to tackle the whole surface at once. Glide the iron back and forth slowly, applying even pressure to remove wrinkles. Don’t rush through; the best results come from working at a steady pace.
4. Focus on the Edges and Elastic Parts for Fitted Sheets
When ironing fitted sheets, pay extra attention to the elastic edges. These tend to be the wrinkliest parts. Hold the fabric taut with one hand while you run the iron along the elastic edge with your other hand, making sure it smooths out properly.
5. Iron the Middle Sections
Once the edges are wrinkle-free, move to the center of the sheet. Use the iron in smooth, sweeping motions, working from one side to the other. If there are any stubborn wrinkles, use the steam function or lightly mist the fabric with water to make it easier to press.
6. Fold and Iron the Final Folds (Optional)
If you like, fold the sheet in halves or quarters after ironing each section and give it one final press. This makes it easier to store and keeps the sheet looking crisp when you put it away.
Additional Tips
– Use Spray Starch: For an even crisper finish, spray starch lightly on the sheet before ironing.
– Iron While Slightly Damp: Sheets are easier to iron when they’re slightly damp. If the sheet has dried completely, you can lightly mist it with a spray bottle before you start.
By following these steps, you’ll have beautifully pressed, wrinkle-free sheets that are ready to make your bed look fresh and tidy. Ironing might take a little extra effort, but it makes a noticeable difference in the appearance and feel of your bedding!


